Sunday, 7 October 2012

Felt Roses


 Yesterday we were invited for dinner with some good friends and I had intended making and taking along a pumpkin pie. Time escaped me though and since the kitchen is not my favourite room in the house I opted instead to take chocolates. To spruce up the offering and hide my baking inadequacy I made a bunch of felt roses to embellish the top. I enjoyed making them and the gift was well received so I thought I'd share how I made them with you.


Now I suppose I am lucky that I have a Sizzix Big Shot and this lovely 3-D Flowers #2 die.  The larger flower produces a rosette around 3.5" and the smaller around 2.25".  The Big Shot is a die cutter - a bit like an Accuquilt (I have one of those too ... yes my secret obsession is emerging here!) Die cutters make life so easy when it comes to cutting odd and complicated shapes - these flowers included although you know I think you could easily get away with cutting this shape freehand and still get great results.  Its hard to see but the die essentially cuts a very long scalloped strip of fabric that spirals round and round and once you have your strip you simply roll and glue to make the rosette. Simples!  It did take me a couple of goes to get the shape right mind.  But anyway heres how I did it in pictures!


Sizzix 3-D Flowers #3 Die number 657153

 I used a 10" square of the Xotic Bamboo/Rayon blend felt we have just got in the shop for each rose and I cut out the larger flower size.

For the chocolate roses I chose Fuchsia, Sangria, Passion Flower and Pina Colada 
(Great names aren't they!)


FuchsiaSangria
Passion FlowerPina Colada


For the tutorial here I am using Pirate Cove (thats the green) and Macaw Red


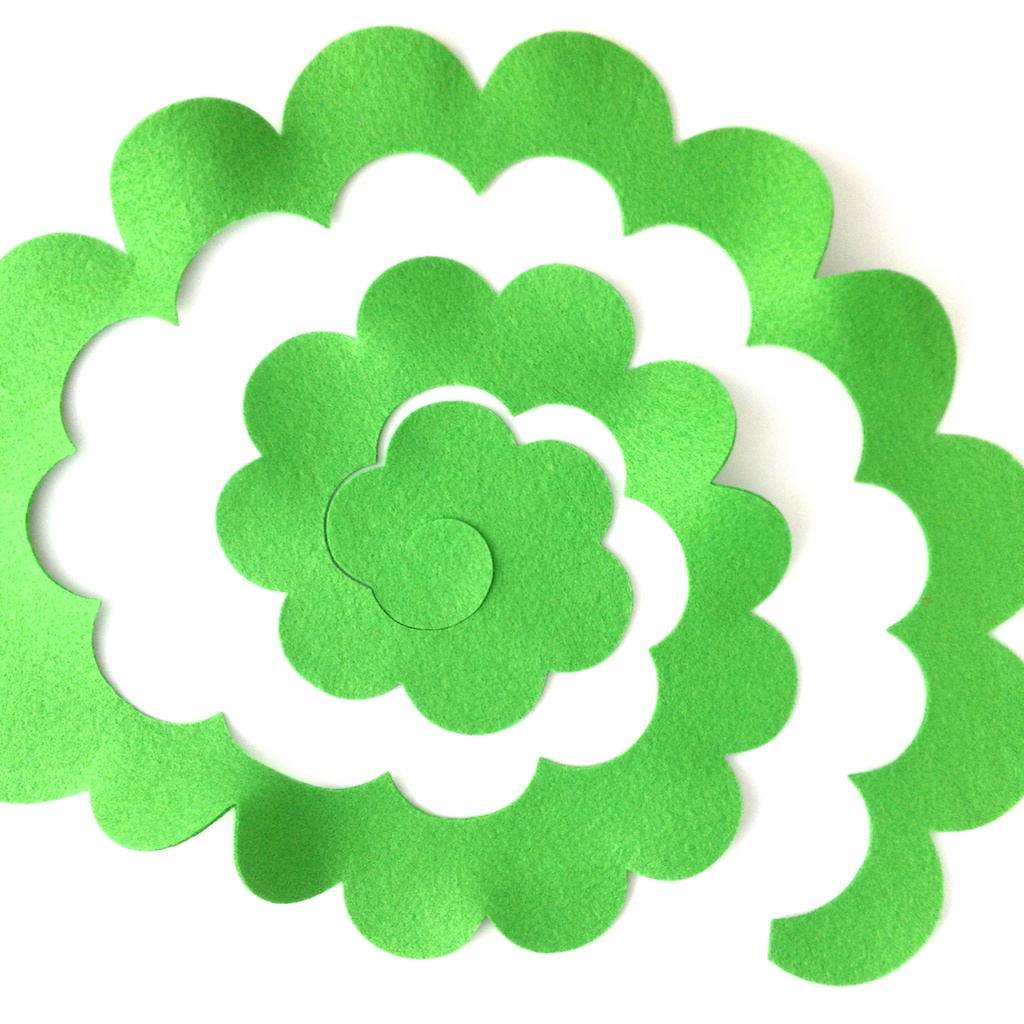
 Cut out the spiral scallop strip 


This is the spiral uncurled 


Now you need glue. I tried sewing them first and it just didn't work as well so sorry folks I have resulted to textile glue.  

I used Gutermann HT2 Textile glue since I had it on hand and it works brilliantly.
 Put a drop of glue on the end of the spiral that starts at the outside (not the bit in the centre)


Fold it over and start to coax it into a curl.


Add more glue dabs at each scallop tip.
When I made the first few I added glue right along the inner edge but you don't need to add that much at all. A small drop every now and again is enough to keep the shape and stop the rosette unfurling.


Start to roll - trying to keep the bottom edge even.
Add more glue drops as needed.


Once you get to the bottom put a larger dab of glue on the base and sit the rose upright. Press lightly to create the rose.  You will have enough time at this stage to mess around with the shape before the glue dries. 

Some rossettes I rolled quite tightly and other I left a little looser.


Let the roses dries for half an hour or so and then add to your chosen chocolate box!  

To fix them to the lid I used strips of double sided tape which is enough to stop them falling off but not so permanent that they can't be removed and used for something else after the chocolates have gone! 


 I'm going to make more red and green roses now and make a christmas wreath next I think.


This is the spiral shape by the way. I think you could easily cut this with scissors but it will take a good deal longer than a die cut of course. 

 What do you think  .. should I add some die-cut felt pieces to the shop


Saturday, 29 September 2012

Ding Dong!

Surfin Santa from Alexander Henry Fabrics


Its been an interesting week this week ... DH has retired from work! Friday was his last day and I can honestly say I have never seen anyone look so happy. He was beaming from ear to ear as he walked out the house. I haven't seen him look like this for many years and I am quite looking forward to having  the 'real-non-corporate-him' around again. He'll be busy with his own interests but he has volunteered to play postman and take the shop orders to the post office. I'm sure he will love carrying those bright pink bags I use! 

So while hubby was smiley I was a bit grumpy this week. I've been waiting patiently for the delivery of the Alexander Henry Christmas fabrics for a few weeks now and I was more than just a little annoyed when I found out that they had been sitting in the delivery office for over 10 days and no one had bothered to inform me. How mad is that?  Anyway after a 40 mile round trip Friday morning I got my mitts on them!  Oooh they are lovely and VERY different. Alexander Henry Fabrics  are known for unusual fabric designs and Surfin Santa and All I want for Christmas fit the 'unusual' bill very well! 
Look at this chilled out Santa!  
Surfin the waves and sipping coconut juice.
Hope he's not so relaxed he forgets Christmas altogether!


and as for All I want for Christmas well 

...ding dong ....

 is all I can say!
All I want for Christmas


Christmas fabric with a difference methinks!


 Joining the christmas stock too this week are some


Green Pompom trim


Jumbo Pompom Trim in Red


The new Berties Bows ribbons were MEGA popular last week. 
So much so they sold out and I had to reorder. 
Thank you. Hope you all liked them!


Quilted with Love ribbon

These Vintage Doily Sewing kits came in too. 
Normally I wouldn't go for anything like this but at £5.50 I think they are really good little stocking fillers. The scissors won me over actually. They have a very clever slide and fold mechanism that makes them tiny enough to fit safely in the tin. 

Vintage Sewing Kit


I also managed to get some crochet and a wee bit of sewing done too. 
On the sewing front I've been making some zigzag blocks with the 
1930's fabrics with Kona Ivory and Celadon. 
(oh, while I remember I got 5 new ones of those this week too)
I haven't got a piccy of the blocks yet but I'll post mid week if I think to. 

So thats it for this week.


Happy Quilting!

Tracey 
xx

ps My broken toe is mending nicely .. you can tell from the reduction in my facial grimaces ..lol!


Tuesday, 25 September 2012

Christmas has Arrived


Woohoo, Christmas has arrived at Quiltmehappy!
More's the pity that I was only able to get my hands on 3 of the fabrics from Val Pillow and Anne Maxfield Christmas line but I think you will agree they are 3 very beautiful prints. I know they are not your usual Christmas colours but I do love fresh and clear-toned hues. I also like that they can be used for other times of the year too.

 I have a plan to make a new christmas table cloth and place mats although I quite like the inspirational cushion they have on their website too.  A simple envelope cushion is an easy 1 hour project too. No buttons or zips to mess with .. so easy. You can download a free envelope tutorial I wrote years to make it even easier too. (Download my  free envelope cushion tutorial from the website)


Christmas by Pillow and Maxfield in Lawn


Azalea Kona cotton solid from Robert Kaufman arrived this week too and it really blends really well with the Christmas line. Very Mod! Its one of the new Kona colours released recently by Robert Kaufman, so they have 243 in the collection now! Thats alot of colours. I think we carry about 40 odd in the shop with Kona SnowKona Ash and Kona White being the most popular. 

 I'm a bit of a green colour fan myself and this Zucchini is a lovely shade somewhere between yellow and green. It's what I call a sophisticated grown up colour. It looks good with Kona Putty and the Robert Kaufman Linens we have. New additions in form of Essex linens Black and Flax arrived in the shop a couple of weeks ago too and ... drum roll please ....I am also pleased to say that after months of waiting  ... literally ...restocks of Essex Linen in Natural  are here.

Kona Cotton Solid in PuttyKona Cotton Solid in ZuchinniBlack Yarn Dyed LinenFlax Yarn Dyed LinenEssex Natural Linen


 But I am really excited about are these grosgrain ribbons from Berties Bows.
Quilted With Love Ribbons

Supplied as precut 3m lengths on cardboard reels (UPDATE: Quilted with Love is now loose by the metre too) they come with a variety of crafting texts. I had to get the Quilted with Love ribbon of course but then I couldn't resist the Knitted with Love or the Baked with Love.  (Not that that I bake but I know people who do!)

These ribbons will be perfect for topping off handmade christmas gift packages don't you think? 

 I also managed to get some rather lovely red and white diagonal striped ribbon too that I am reliably told will be seen on Kirsty Allsopps new C4 programme "Kirsties Vintage Home" ! Cant wait to watch that. If you pop over to her website she has the most gorgeous piece of screen printed recycled furniture designer by designer Zoe Murphy  that I am lusting after!


Red and White Diagonal Strip Ribbon

So what else can I tell you?  On the home front I am recently back from helping daughter (who turns 20 this week .. blimey I must be old) into her shared house for uni. That was eventful!  I dropped a book shelf on my big toe and broke it but being the northern lass I am I mustered on and we had just got things sorted out when the upstairs flat sprung a massive leak and brought the ceiling down ! Good job we were there is all I can say. Place is all fixed up now and I'm home for a rest! 


Happy Quilting!
Tracey
x


Tuesday, 28 August 2012

Working a booth


It's well over a week now since I got back from trading at the Festival of Quilts and I'm still tired!  

I knew the whole affair would knock the stuffing out of me but good grief I was/am  soooooooo tired. Working 18 hour days for 3 weeks solid prior to going, loading and unloading 15-20  trolley loads of stuff and working 12 hour days at the show have took a toll on me. 


Getting the booth organised ! 
See my trusty trolley .. that so saved my back ...a bit!


Don't get me wrong, I loved every moment of it but goodness knows my body was sooooo not prepared. Overworked, over 50 and over-weight are not conducive to a being a booth holder .. lol!  


The Parson Gray target quilt kit was VERY popular and sold out by the end of day 2. Good news though .. I have new kits coming! 


Kona Cottons sold well too - in their pretty rolls and by the metre too.


The wonky log cabin quilt was made in a class I took with 
Quilt Dad at the Fat Quarterly retreat in June


and Pat Bravos delicious Art Gallery Fabrics


 It was such a fun time though and I can't tell you how much I enjoyed doing it. 


I got home late Sunday/ early Monday morning and just collapsed in a heap but a quick change of hats from shop owner to mum meant I was on the treadmill doing mummy things straight away. Dad had held the fort very well - he always does - but he was back to work and I was at the helm again. But since I hadn't seen them for quite a while we went on a day trip to London. Meeting my sister and nieces too we all had a fab day out getting completely scared out of our minds when we visited the London Dungeons experience. What a laugh. Open air entertainment followed at Covent garden then dinner at the wonderful Drury Lane Sarastro's restaurant


What an antidote to what could only be described as a FULL-ON month.


Monday, 13 August 2012

Festival of Quilts 16th -19th August

If I've been a bit quiet recently its because I have been UBER busy cutting, packing, wrapping and stuffing. 

For the last 3 weeks its been non stop preparation to take QuiltMeHappy to the the Festival of Quilts in Birmingham 16th -19th August. 

We will be on stand N22 so do come and visit.


Getting ready has been very tiring.  I completely underestimatated how much time it would take to get ready plus a few late orders for quilting delayed my progress but today the car is loaded and tomorrow I will be on my way. Woo hoo! 

I'm happy!

I have all sorts of new and lovely things to show you too. 


A Parson Gray ZigZag quilt


This took 16 FQ and some groovy green linen for backing.


The Original Parson Gray Target Quilt : Made up! 


This s a dead easy quilt to make ONCE you have the templates drawn out! 
I hate enlarging patterns so I have made up a kit with FULL size pattern pieces.
So all you have to do is open the bag, cut and sew! 


Urbanicity!

I adore this quilt! Its sooooooo easy to make too. The blocks are actually on a panel and available with cream or black sashing but its wonky sashing.  If you can live with wonky thats great all you need do it add a border and quilt. But if you are like me and wonky drives you crazy then cut the blcoks out and resew - straight!

Fabric kit available with 
Panel
Kona Snow sashing
Uranicity Border and
Alexander Henry Cite backing


or hows about this lovely Kokka fabric grocery bag.
Little Red Riding Hood!

Made from half a meter of fabric and some natural upholsery strapping.


or a lovely simple baby receiving blanket


OR 

this lovely Amelia Dress pattern and kit by BRAND NEW DESIGNER


MummyLovesLily


The Amelia Dress Sewing Pattern is a great versatile garment. 
The shirring on the bodice allows the garment to grow with the child, it can be worn as a sundress or layered over a long-sleeved top and when your little girl grows it can become a tunic top teamed with leggings.  The pattern is sized for 6-12 months to 4-5 Years.

Emma - the designer/sewer behind new brand MummyLovesLily uses amazing Pat Bravo fabrics and we will have a the dress pattern and fabric available as a kit. She has very kindly dropped off 6 dresses for me to take to Festival too -  and these will be available for sale ... just in case you dont want to sew a dress yourself.  The pattern for this dress is AMAZING though. She adds so much detail to them.


If you are a new quilter then a Quilt in the bag maybe


or for a little girl this lovely Sweet Shoppe Quilt


Happy Quilting 

Come see us at N22!